Counter[]
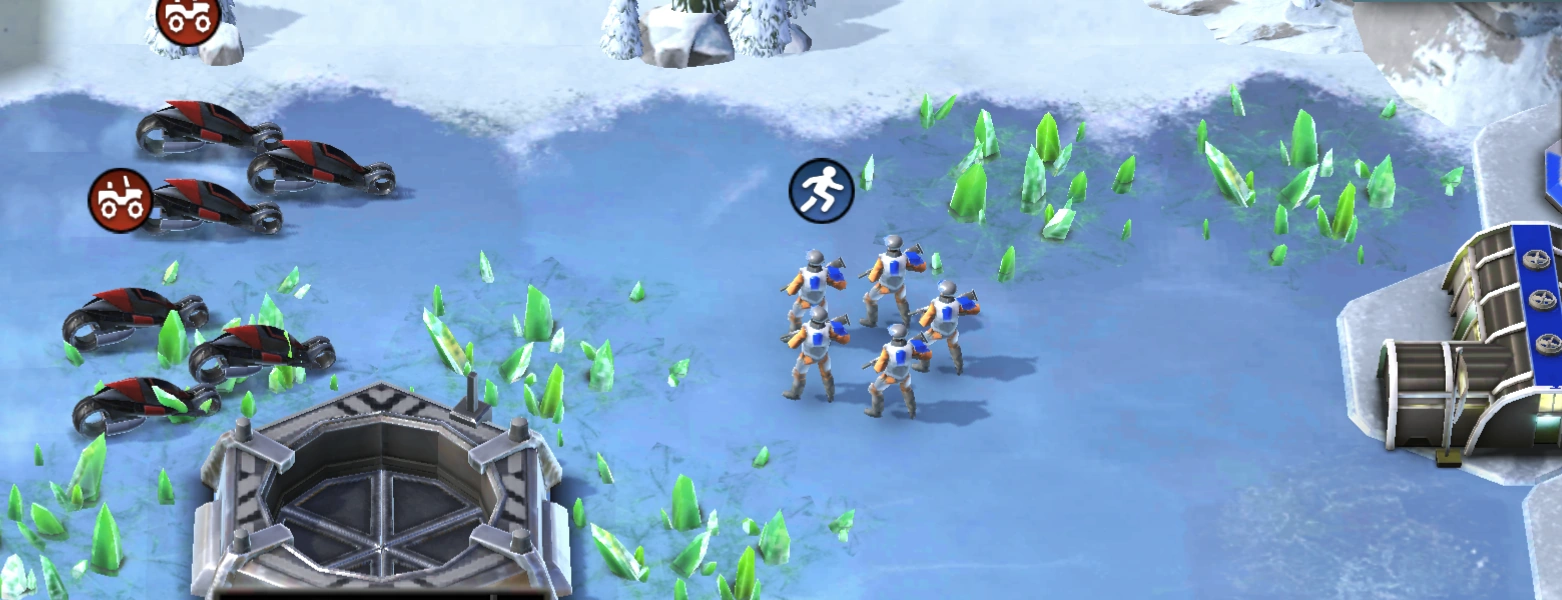
Rhino losing to Attack bikes despite having defender's advantage
At the root of any strategy game is playing correct units at what the opponent brings to the table. All units are either infantry, vehicles, aircraft or buildings. Combat units can do better or worse against each of the unit types.
For example, Militants are an infantry unit that is powerful against other infantry units, can do some amount of damage to vehicles and are unable to attack air units. In the game interface it's shown as ![]()
![]()
![]() . To counter an enemy Militant squad, it would make sense to send and anti-infantry unit, preferably aircraft (like Drone swarm or Rhino).
. To counter an enemy Militant squad, it would make sense to send and anti-infantry unit, preferably aircraft (like Drone swarm or Rhino).
It is useful to learn the unit special properties and the damage the unit deals to each unit type. For example, Cyberwheels and Buggies are both weak against vehicles, but the Buggy does around three times as much damage. On the other hand, against tanks the Buggy will fall apart quickly, but the squad property of the Cyberwheels will allow them to survive longer.
More expensive units tend to deal more damage and ofttimes come out victorious against units they should lose against. Titan will defeat a Laser squad, even though the former is nominally weak against anti-vehicle infantry. Although the Titan will win, it will not do so cost efficiently.
If the usual counters are not good working, hard counters should work.
Defense[]
Shockwave troopers having a decisive win over Flame troopers even though both units have almost identical stats
Units usually can't attack while moving, this gives time for standing units to begin attacking before the opponent moves close enough to start attacking. Several factors determine how at a disadvantage the attacker is:
- Squad units lose firepower when a member of the squad dies, making them even less effective against defending units.
- The faster attacker can get into the position, the less damage they take.
- Units with raider ability tend to not suffer penalties.
- Due to slow missile movement speed, an Attack bike mirror gives no advantage to the defender.
The most effective way to counter a defensive unit is to send a #Counter unit, which will either win the match-up or force it to retreat and lose the advantage.
Hard counter[]
Similar to counter, but the unit is expected to not only win, but also take minimal to no damage. For example, Talon can attack Laser drones without taking any damage. This tactic is critical when having a substantial unit level disadvantage. On even levels, hard countering helps to preserve Tiberium.
Even with huge level advantage, War dogs quickly go down against Laser drones
2v1[]
Two Riflemen squads defeating a much stronger Flame troopers
Two units attacking one. This attack allows numerous weak units to defeat a much more expensive units.
Two units are about the same strength as a unit with extra 7.3 levels.
This tactic costs an extra population cap, but allows to come out ahead in #Tiberium trade.
Pad control[]
Although launching the missiles is the main win condition in Rivals, it doesn't mean that whoever charges the pads the most will win. It only matters who controls the pads during the last moments of the missile charging. To secure the launch of the missile, it's preferable to have at least one unit on every pad, to prevent a sudden missile flip. See also #Harvester pull.
Aggro deck players benefit from firing the missile as soon as possible, so they would position themselves so that either they or the opponent is charging the missile (progress bar is blue or red). Tech decks tend to be weaker in the early game, so they would benefit from missile stalling (progress bar is grey or yellow), so they would have the time to earn enough Tiberium to bring out the big guns.
Base kill[]
The primary objective in Rivals is to destroy the base. Although launching the nuclear missile is the most popular way to do it, a direct base attack also does the job. Direct base attack can be risky — a failed attack can waste a lot of Tiberium and lose the map control completely.
Attacking the base is usually a situational play. Examples of when it might be a good move:
- The opponent controls the pads and attacking the base directly forces them to either give up pad control or lose the base.
- Commander has good anti-structure units in their deck (like Disruptor and Chemical warriors) and they can kill the base quickly.
Kite[]
Kiting is when a unit moves into the firing range, fires or gets a lock-on and moves out harms way to reload. This is a natural tactics for units with burst damage, but can also be employed by fast moving units like Attack bikes or quick lock-on units like Predator tanks. Kiting is especially effective when done through a #Wall.
With kiting Scorpion tank is able to defeat the Sandstorm. If Scorpion tank weren't kiting, the Sandstorm would have killed it in two quick volleys
Stack[]
Four Scorpion tanks manage to take out a Mammoth tank with only losing a single tank by squeezing in a couple of tiles
Getting multiple units on a single tile. Although only one unit can occupy a single tile, unlimited number of friendly units can move through a tile. If the moving units have raider ability, they can attack as they move. Examples:
- Sending multiple Pitbulls through a single tile allows to add up their firepower while finding safety in numbers. It works with Scorpion and Predator tanks as well.
- Leaving a stationary Mutant marauder squad to guard a spot and move a Chem buggy through it to attack infantry.
- Mohawk gunship and Missile squads creating a #Wall while Razorback moves in and out to target infantry.
Stacking also makes it difficult for the opponent to select an individual target in the stack. This allows damaged units to have a better chances of survival in the confusion.
Stacking is the foundation for #Wall, #Juggle tactics.
Juggle[]
Harvesters swapping places, allowing both of them to survive the rush
Swapping out a wounded unit out of the firing line by moving it through friendly unit, using unit #Stacking.
To swap two units, move one of them to any available unoccupied tile and immediately move the other unit into the free spot. After that order the first unit to move into the place of the second unit. If the timing is off, enemy units can squeeze into the free tile.
Since the juggling requires at least one reachable unoccupied tile, it can be stopped by completely surrounding the target, or at least #Path blocking free tiles.
Shockwave trooper swaps with Rhino, allowing it to avoid unfavorable matchup without giving up pad control
Harvester pull[]
Moving the harvester onto the pads when the nuclear missile is about to launch. The harvester can take a lot of damage and free up the other units to contest the other pads. This hurts the Tiberium income and if the missile is stalling for a long time, it can cripple the economy. Not practical on all maps.
Wall[]
Harvester escaping a rush by moving behind a wall of Missile squads
Units blocking opponent from accessing vulnerable units or POIs behind them. Although wall can be set up anywhere, the most useful place for them is at the choke-points, where it takes only a few units to hold the line.
Unlike #Body block, the wall takes very little micromanagement time and can shoot while blocking.
Chem buggy retreats from Pitbull by going through the marauder wall
Dance[]
Moving in and out of a tile, not allowing an opponent to either onto the tile, or to effectively attack the dancing unit. Works the best when the attacker has long initial attack delay. Somewhat similar to #Body block. Dancing is very micro-intensive and can often fail if playing on an emulator or a slow internet connection.
Cyberwheels dancing in front of a Sandstorm, not allowing it to fully attack or move onto the pad
Bait[]
Militant squad eating shots from the M.L.R.S. giving Scorpion tank time to close the distance
Moving a decoy unit into the range of a burst unit, making it attack the decoy. The longer the reload speed, the more damage baiting does. It's most effective in combination with #Stacking.
This move can be countered by moving the burst unit around before the desired target is in sight. Most burst units can't attack while moving.
Harvester rush[]
Starting the match by sending units to attack opponent's harvester. If the rush is successful, it can provide Tiberium income that affords new units. A failed rush tends to leave the attacker behind in economy.
Most popular rushing units:
- Attack bikes,
- Laser drones with Venom support,
- Jump jet troopers.
It's best countered by #Scouting.
Scout[]
To decide what units to make and when, it helps to know what the opponent is doing. Scouting is surveying map to see what units the opponent has deployed and what buildings have been erected. Scouting can be done with any unit, but most effective are cheap, fast units with vision range 3, like Riflemen or Cyberwheels.

Riflemen descover a bike rush, allowing the commander to respond with Missile squad instead of a Harvester
| “ | Keep enemy units away from your base so they can't scout your buildings. - Game tip |
” |
Tiberium trade[]
One way to look at the battles is through the unit costs. If two Riflemen squads (each costs 10) just barely kill a Flame trooper squad (costs 40), it could be said that the GDI has traded 20 Tiberium for Nod's 40 Tiberium, or traded up by 20 Tiberium. Trading favorably is essential to save up Tiberium for more powerful units.
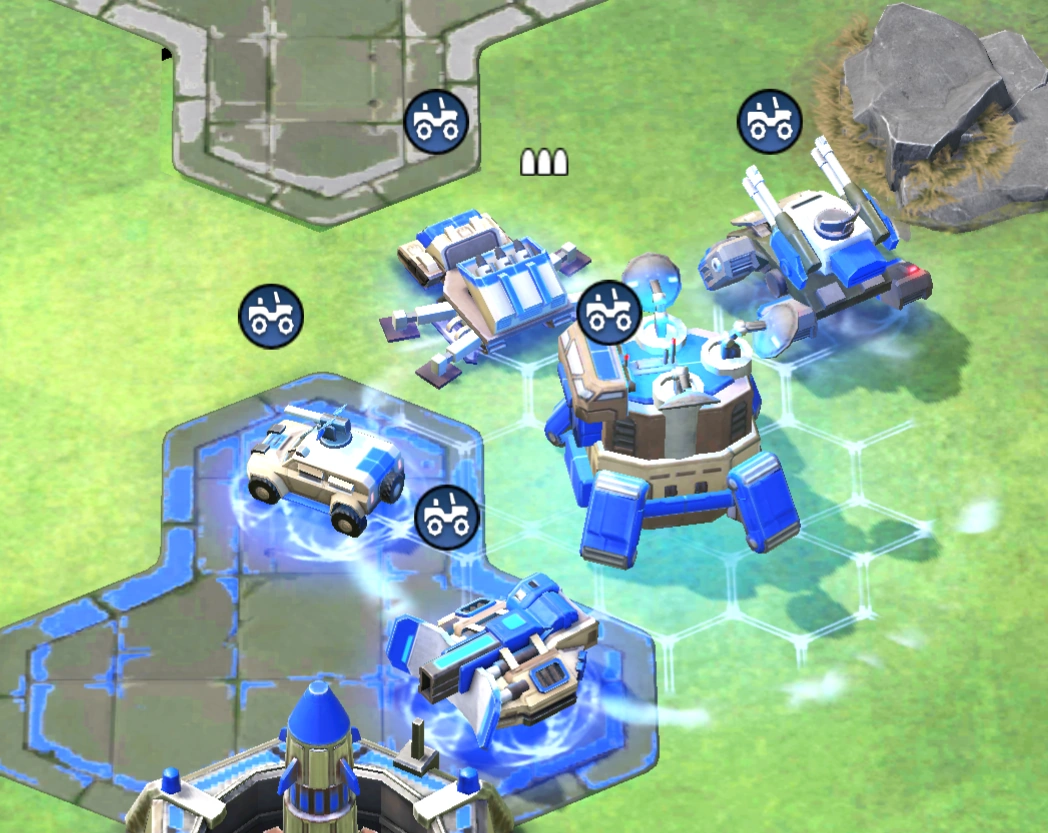
Fortress[]
A setup where a deployed long range unit covers ground and is supported mobile units who protects the deployed unit. Fortresses tend to be very difficult to break up, but takes significant effort to set up.

GDI fortress with M.L.R.S. for vehicles, Shatterer for infantry, Slingshot for aircraft and Rhino as support
Chip damage[]
Seemingly small damage that changes the outcome of a battle. Most noticeable with slow firing or burst units whose shots leave the target barely alive and couple of shots of fast firing unit would take out the unit. For example, when Shade attacks a Pitbull, it leaves it with a sliver of health. If left alone, the Pibull can do serious damage back to the Shade, but if there is a Militant squad nearby, it will destroy the Pitbull with just several shots.
As a rule of thumb, if a unit has no suitable target on the field, it should target less suitable units to chip away their health.
Mohawk takes two shots to kill a single Bike, but when Bikes are also attacked by Razorback (which deals small damage to vehicles), it damages the Bikes enough that it only takes one shot from the Mohawk
Path block[]
Four Predator tanks use stacking to get a 4v1 against an Avatar. Cyberwheels block the Predator path and forces two of them to disengage from the battle
It's achieved by putting a unit in the path of another unit, thus forcing in to find another route or give up.
Venom temporarily pushing a Rhino off the pad. Rhino responds by moving through the Venom tile. A vehicle can block an aircraft in the same way
Body block[]
War dogs protecting an MG squad from Chem buggy by occupying multiple tiles in front of MG
Two ground units from the opposing teams can't occupy the same tile, this means that opponent can't move their ground unit into or over opponents ground unit, even if the unit is only partially on the tile. This allows units to block movement of other units, by moving to and from the other tile and not completing the maneuver.
Unless it has a raider ability, the body-blocking unit can't fight back. Therefore the body-blocking tends to get used only to hold the pads shortly before the missile fires or to deny access to more valuable units, like Harvesters.
Ways to counter a body block:
- Consider if it's better to just stand and attack the blocking unit.
- Use nearby aircraft to move over the blocker.
- Use boosts to increase unit movement speed — faster units have better chances to squeeze in.
- Contest other pads — body-blocking is micro-intensive and doesn't leave much time to manage other units.
- Keep trying to get past — opponent might make a mistake.
The same mechanics work between air units, but ground units can't block air, and aircraft cannot block ground units.
Body block a special case of #Path block.
Pop cap[]
Leaving opponent's squad units barely alive, so they can do very little damage, but take up a full population slot.
To counter this move, infantry squads can be placed into the Tiberium field, where they take damage. Vehicle squads can try to force and engagement or can be placed near the opponent's spawn point, where it can block the unit movement.